고정 헤더 영역
상세 컨텐츠
본문
반응형
줌 라이브트랙 L-8, ZOOM LIVETRAK L8
줌 라이브트랙 L-8, ZOOM LIVETRAK L8
줌 라이브트랙 L-8

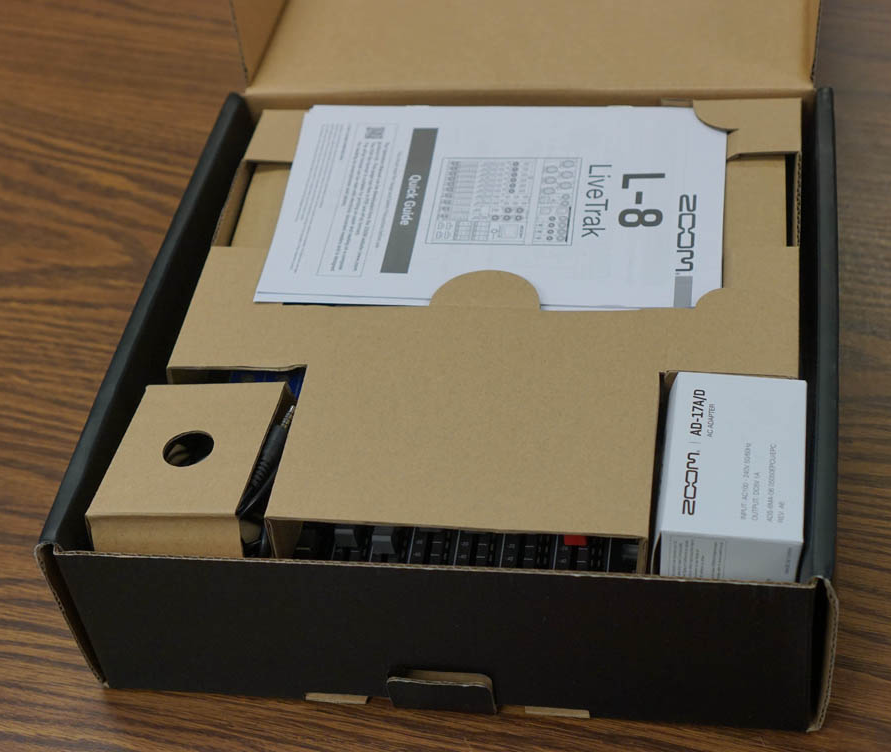
Zoom’s LiveTrak L‑8 (I’ll call it the L‑8 for short) is aimed at a very broad audience with a range of different workflows but, while an affordable hybrid product like this will inevitably lack some features for some users, I reckon Zoom have managed to strike a great balance between sonic quality, functionality, ease‑of‑use and price. So let’s take a closer look at what this thing can do — and what it cannot — starting with its role as a digital mixer, before moving on to the USB interfacing and standalone recording side of things.
Zoom의 LiveTrak L-18(줄여서 L-1)은
다양한 워크플로우를 갖춘 매우 광범위한 오디언스를 대상으로 하지만,
이와 같은 저렴한 하이브리드 제품은 일부 사용자에게는 일부 기능이 부족할 수밖에 없지만,
Zoom은 음질, 기능성, 사용 편의성, 가격 사이에서 큰 균형을 이루었다고 생각합니다.
이제 디지털 믹서로서의 역할부터 시작하여
USB 인터페이스와 독립형 녹음 측면으로 넘어가기 전에 이 기능이 무엇을 할 수 있는지,
무엇을 할 수 없는지 자세히 살펴보겠습니다.
줌 라이브트랙 L-8, ZOOM LIVETRAK L8
줌 라이브트랙 L-8
As a digital mixer, the LiveTrak L‑8 is fairly simple, in that all the input channels are permanently routed to the master stereo bus. There are no subgroup buses or, other than one that goes directly to the internal effects engine, aux sends. That effects send is available to all channels except, obviously, the effects’ stereo return channel and the stereo master mix channel. However, some behind‑the‑scenes digital sophistication means that it is still perfectly possible to create and distribute different cue mixes, or send signals to external processors/effects.
디지털 믹서로서 LiveTrak L-18은
모든 입력 채널이 마스터 스테레오 버스로 영구적으로 라우팅된다는 점에서
비교적 간단합니다.
내부 효과 엔진으로 직접 연결되는 보조 버스를 제외하고는 하위 그룹 버스나
보조 버스가 없습니다.
이러한 효과 전송은 당연히 효과의 스테레오 리턴 채널과
스테레오 마스터 믹스 채널을 제외한 모든 채널에서 사용할 수 있습니다.
그러나
일부 비하인드 디지털 정교함은
여전히 다양한 큐 믹스를 생성하고 배포하거나 외부 프로세서/효과에 신호를 보내는 것이
완벽하게 가능하다는 것을 의미합니다.
줌 라이브트랙 L-8, ZOOM LIVETRAK L8
줌 라이브트랙 L-8

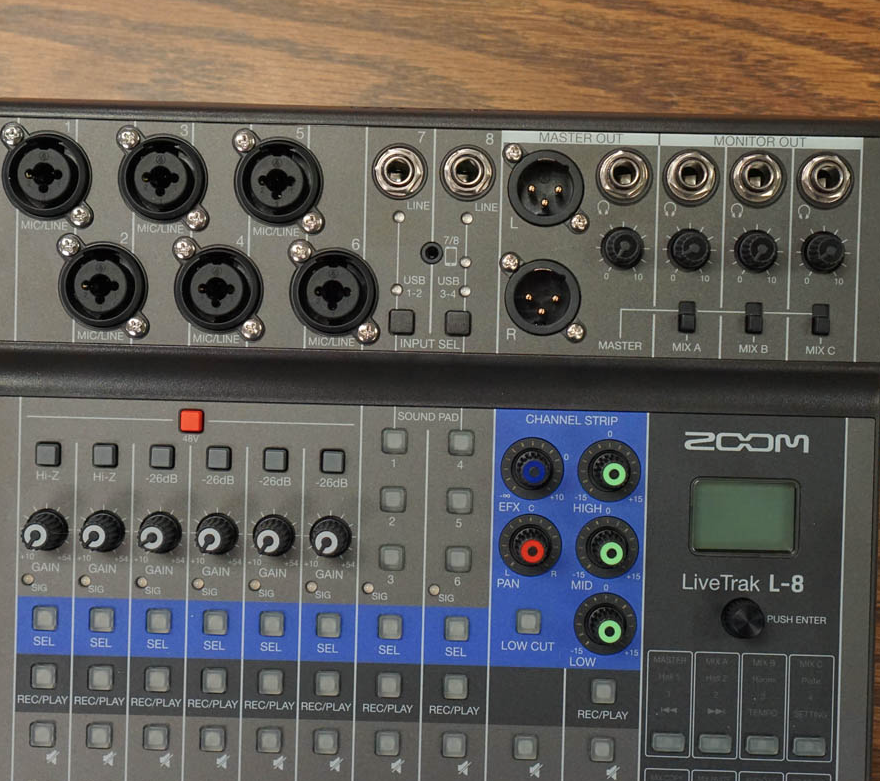
In addition to the master stereo channel and the stereo EFX RTN, the mixer has eight input channels. The first two accept mic, line or instrument sources, the last selected using a Hi‑Z button above the gain pot. The next four can be used with mic or line sources and feature a ‑26dB pad. 48V phantom power is switchable globally for the six mic inputs; there’s no LED indicator but a message flashes on the screen when phantom is engaged, or if it is engaged when you switch the unit on. Finally, channels 7 and 8 cater for a number of different sources: each can receive mono line‑level sources (TS jack), a stereo USB out from a connected computer, or samples triggered by the six Sound Pads (see box). These two channels can also, when used in combination, receive a stereo analogue line signal on a TRRS mini‑jack, with a ‘mix minus’ monitoring function to prevent feedback, providing a way to connect smartphones for podcasts, video conferencing and so on.
마스터 스테레오 채널과 스테레오 EFX RTN 외에도
믹서에는 8개의 입력 채널이 있습니다.
처음 두 개는 마이크, 라인 또는 악기 소스를 사용할 수 있으며,
마지막으로 선택된 소스는 게인 포트 위의 Hi-Z 버튼을 사용하여 선택됩니다.
다음 네 개는 마이크 또는 라인 소스와 함께 사용할 수 있으며,
‑26dB 패드가 특징입니다.
48V 팬텀 전원은 6개의 마이크 입력에 대해 전 세계적으로 전환할 수 있으며,
팬텀이 작동할 때나 장치를 켤 때 화면에 LED 표시등이 아니라 메시지가 깜박입니다.
마지막으로,
채널 7과 8은 다양한 소스를 제공합니다
각각 단일 라인 레벨 소스(TS 잭),
연결된 컴퓨터에서 스테레오 USB를 꺼내거나 여섯 개의 사운드 패드(참조 상자)로
트리거된 샘플을 받을 수 있습니다.
이 두 채널을 결합하여 사용하면 TRRS 미니잭에서 스테레오 아날로그 라인 신호를
수신할 수 있으며, 피드백을 방지하는 '믹스 마이너스' 모니터링 기능을 통해 팟캐스트,
화상 회의 등을 위한 스마트폰 연결 방법을 제공합니다.
줌 라이브트랙 L-8, ZOOM LIVETRAK L8
줌 라이브트랙 L-8

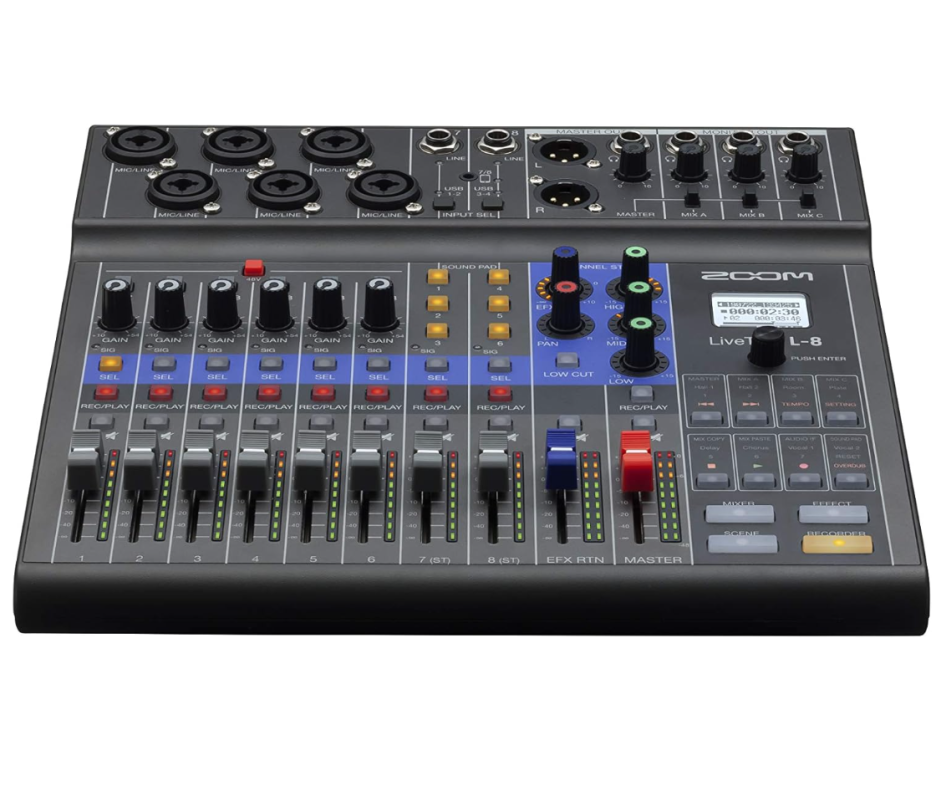
The main stereo mix comes out on two balanced XLRs, and that signal is duplicated on the first headphone output. It’s also available on three more headphone outputs, each of which, like the first, has a dedicated level control. These three can be switched to monitor one of three secondary mixes, Mix A, Mix B and Mix C, of which more below. The headphone amps sound clean and clear and do the job well for most headphones, though with high‑impedance models I found there wasn’t lots of gain in reserve — occasionally frustrating when I was miking quiet sources, but it won’t be an issue for most users.
메인 스테레오 믹스는 두 개의 균형 잡힌 XLR로 제공되며,
이 신호는 첫 번째 헤드폰 출력에서 복제됩니다.
또한
첫 번째 헤드폰 출력과 마찬가지로
각각 전용 레벨 제어 기능이 있는 세 가지 헤드폰 출력에서도 사용할 수 있습니다.
이 세 가지는 Mix A, Mix B, Mix C의 세 가지 보조 믹스 중 하나를
모니터링하도록 전환할 수 있으며,
그 중 더 많은 부분을 모니터링할 수 있습니다.
헤드폰 앰프는 깨끗하고 선명하게 들리며 대부분의 헤드폰에서 잘 작동하지만,
고성능 모델에서는 예비력이 크게 향상되지 않아
조용한 소스를 믹싱할 때 가끔 답답할 때가 있었지만
대부분의 사용자에게는 문제가 되지 않을 것입니다.
줌 라이브트랙 L-8, ZOOM LIVETRAK L8
줌 라이브트랙 L-8

Each of the eight input channels has its own fader, mute (but not solo) and Select buttons, and when a channel is selected you can tweak further parameters in the Channel Strip section. This has five continuous rotary encoders and a (12dB/octave 75Hz) high‑pass filter button. Each encoder is circled by 13 LEDs, but as each LED has five levels of brightness and they light in combinations you’re treated to a finer level of indication than first sight suggests. A very minor gripe is that the height of the knobs means they obscure some LEDs’ default positions (eg. centre pan) when you’re seated, with the L‑8 on your desktop. The encoders control panning, the effects send level and a three‑band EQ, comprising high (10kHz) and low (100Hz) shelves and a peaking mid band (2.5kHz). Each band can boost up to ±15dB, again in fine enough steps that you have plenty of control.
8개의 입력 채널 각각은 자체 페이더,
음소거(단독은 아님) 및 선택 버튼을 가지고 있으며,
채널을 선택하면 채널 스트립 섹션에서 추가 매개변수를 조정할 수 있습니다.
이 인코더에는 5개의 연속 회전 인코더와
(12dB/옥타브 75Hz) 고역 통과 필터 버튼이 있습니다.
각 인코더는 13개의 LED로 둘러싸여 있지만,
각 LED는 5단계의 밝기를 가지고 있으며 조합하여 빛을 내기 때문에
첫 눈에 보이는 것보다 더 세밀한 수준의 표시를 받을 수 있습니다.
아주 작은 그립감은 노브의 높이 때문에 책상에 앉아 있을 때
일부 LED의 기본 위치(예: 중앙 팬)가 가려진다는 것을 의미합니다.
인코더는 패닝, 효과 전송 수준 및 3밴드 EQ를 제어하며,
이는 높은(10kHz) 및 낮은(100Hz) 선반과 피크 중간 밴드(2.5kHz)로 구성됩니다.
각 밴드는 충분한 제어가 가능할 정도로
충분한 미세한 단계로 ±15dB까지 부스트할 수 있습니다.
줌 라이브트랙 L-8, ZOOM LIVETRAK L8
줌 라이브트랙 L-8
Despite this being a digital desk (meaning no physical routing limitations in between the converters) you can’t apply EQ to the effects return or master mix; I can’t say I missed that ability but some might. Naturally, you can’t apply reverb to the main mix, since there’s only one effects engine and its signal already flows to the mix bus.
디지털 데스크임에도 불구하고
(컨버터 사이의 물리적 라우팅 제한이 없음을 의미함),
EQ를 효과 반환이나 마스터 믹스에 적용할 수는 없습니다.
그 능력을 놓쳤다고 말할 수는 없지만, 일부는 놓칠 수도 있습니다.
물론 메인 믹스에는 리버브를 적용할 수 없습니다.
왜냐하면 효과 엔진이 하나뿐이고 신호가 이미 믹스 버스로 흐르기 때문입니다.
줌 라이브트랙 L-8, ZOOM LIVETRAK L8
줌 라이브트랙 L-8

Many potential purchasers will be primarily interested in the L‑8’s recording capabilities. It can be used either as a USB 2.0 audio interface or as a standalone multitracker, recording directly to class‑10 or higher SDHC (up to 32GB) or SDXC (up top 512GB) cards. You can record at 24‑bit 44.1, 48 or 96 kHz to a card, though 96kHz isn’t supported over USB. Neither can you use the Sound Pads, send effects, EQ or the multitracker’s Overdub mode, at 96kHz. There’s a class‑compliant USB driver for iOS, and for Mac/Windows you download a driver from Zoom’s website. Once installed, ensure the L‑8 is in Mixer mode, then press function button 8, labelled Audio I/F, and you’re good to go.
많은 잠재 구매자들이 주로 L-8의 녹음 기능에 관심을 가질 것입니다.
이 제품은 USB 2.0 오디오 인터페이스 또는 독립형 멀티트랙커로 사용할 수 있으며,
클래스-10 이상의 SDHC(최대 32GB) 또는
SDXC(최대 512GB) 카드에 직접 녹음할 수 있습니다.
카드에 24비트 44.1, 48 또는 96kHz로 녹음할 수 있지만,
96kHz는 USB를 통해 지원되지 않습니다.
96kHz에서는 사운드 패드, 전송 효과,
EQ 또는 멀티트랙커의 오버듀브 모드를 사용할 수 없습니다.
iOS용 클래스 호환 USB 드라이버가 있으며,
Mac/Windows용 드라이버는 Zoom 웹사이트에서 다운로드할 수 있습니다.
설치가 완료되면 L-8이 믹서 모드에 있는지 확인한 다음
오디오 I/F 라벨이 붙은 기능 버튼 8을 누르면 바로 사용할 수 있습니다.
줌 라이브트랙 L-8, ZOOM LIVETRAK L8
줌 라이브트랙 L-8

Your computer is presented with 12 inputs. The eight input channels’ signals (7 and 8 each have left and right channels) are taken directly after the preamp, before the Channel Strip and fader, while the stereo mix is captured post‑fader. So you can record the clean input signals and tweak settings on playback, but can also capture the live stereo mix, with all your EQ, effects and fader moves applied. This way, it makes good sense for recording projects, for live streaming, and recording live performances while also delivering monitor and PA mixes. The L‑8 can receive two stereo feeds from the computer, one on channel 7 and the other on channel 8. Note that selecting the USB return on either channel will limit your access to other sources (eg. Sound Pads) that are exclusive to those channels.
컴퓨터에는 12개의 입력이 제공됩니다.
8개의 입력 채널(각각 7개와 8개의 왼쪽 채널과 오른쪽 채널이 있음)의 신호는
프리앰프 직후 채널 스트립과 페이더 전에 촬영되며,
스테레오 믹스는 페이더 후에 캡처됩니다.
따라서 깨끗한 입력 신호를 기록하고 재생 시 설정을 조정할 수 있지만,
모든 EQ, 효과 및 페이더 동작을 적용하여 라이브 스테레오 믹스를 캡처할 수도 있습니다.
이렇게 하면 프로젝트 녹음, 라이브 스트리밍, 라이브 공연 녹음에 적합하며
모니터와 PA 믹스도 제공할 수 있습니다.
L-8은 컴퓨터로부터 두 개의 스테레오 피드를 받을 수 있으며,
하나는 채널 7에, 다른 하나는 채널 8에 있습니다.
두 채널 모두에서 USB 반환을 선택하면
해당 채널 전용의 다른 소스(예: 사운드 패드)에 대한 액세스가 제한된다는 점에 유의하세요.
줌 라이브트랙 L-8, ZOOM LIVETRAK L8
줌 라이브트랙 L-8

As mentioned in passing, you can create up to four different post‑fader mix balances — the main mix, Mix A, Mix B and Mix C — and each can be sent to its own headphone output if desired. So it’s possible to use these to create artist monitor mixes or to feed external processors/effects (you’d have to return them on spare mixer channels). You can copy and paste from one mix to another, making it quick and easy to set up personalised cue mixes. The faders aren’t motorised, but switch between mixes and the level meter LEDs will helpfully light to indicate the ‘virtual fader position’ for each channel, and turn off when the fader is at the correct position. As this device costs less than many eight‑fader control surfaces, I reckon that’s a the perfect balance of cost and convenience.
메인 믹스인 믹스 A, 믹스 B, 믹스 C의
최대 네 가지 다른 포스트 페이더 믹스 밸런스를 만들 수 있으며,
각 믹스는 원하는 경우 자체 헤드폰 출력으로 전송할 수 있습니다.
따라서
이를 사용하여 아티스트 모니터 믹스를 만들거나
외부 프로세서/이펙트를 공급할 수 있습니다(예비 믹서 채널에 반환해야 함).
한 믹스에서 다른 믹스로 복사하고 붙여넣기할 수 있어
개인화된 큐 믹스를 빠르고 쉽게 설정할 수 있습니다.
페이더는 모터가 작동하지 않지만 믹스와 레벨 미터 LED를 전환하면
각 채널의 '가상 페이더 위치'를 표시하는 데 도움이 되고,
페이더가 올바른 위치에 있을 때 꺼집니다.
이 장치는 8페이더 제어 표면보다 저렴하기 때문에
비용과 편의성의 완벽한 균형이라고 생각합니다.
줌 라이브트랙 L-8, ZOOM LIVETRAK L8
줌 라이브트랙 L-8

It’s important to understand that the Mixes store only the fader settings: the Gain, Pad/Hi‑Z, Select, Channel Strip and Mute status aren’t recalled. But more settings can be stored in what Zoom call Scenes. Several settings are stored in each Scene: the fader positions (for every channel, including EFX RTN and Master); Mute status; all Channel Strip settings; the selected effect patch and parameters; and the input source selection for channels 7+8.
믹스에는 페이더 설정만 저장된다는 점을 이해하는 것이 중요합니다
게인, 패드/하이존, 셀렉트, 채널 스트립 및 음소거 상태는 리콜되지 않습니다.
그러나
더 많은 설정은 Zoom이 Scenes라고 부르는 곳에 저장될 수 있습니다.
각 Scene에는 페이더 위치(EFX RTN 및 마스터 포함),
음소거 상태, 모든 채널 스트립 설정, 선택된 효과 패치 및 매개변수,
그리고
채널 7+8의 입력 소스 선택 등 여러 설정이 저장됩니다.
줌 라이브트랙 L-8, ZOOM LIVETRAK L8
줌 라이브트랙 L-8

Hit the big Scene button at the bottom right, and the eight multi‑function buttons beneath the screen give you direct access to seven separate scenes which can be stored and recalled. Press a button and you have the option to save/overwrite or recall the Scene or cancel to take you out of the menu. The eighth button allows you to reset the selected Scene. It’s a very helpful facility and really intuitive. It might have been nice to be able to recall the channel Select status too, and the Rec/Play status for the multitrack recorder (discussed below), but those aren’t mission‑critical omissions.
오른쪽 하단의 큰 장면 버튼을 누르면
화면 아래의 8개의 다기능 버튼을 통해 저장 및 호출할 수 있는
7개의 개별 장면에 직접 액세스할 수 있습니다.
버튼을 누르면 장면을 저장/ 덮어쓰거나 호출하거나 취소하여
메뉴에서 꺼낼 수 있는 옵션이 있습니다.
여덟 번째 버튼을 사용하면 선택한 장면을 재설정할 수 있습니다.
매우 유용한 기능이며 매우 직관적입니다.
채널 선택 상태와 멀티트랙 레코더의 재생/재생 상태(아래에서 설명)도 기억할 수 있었다면
좋았을 텐데, 미션 크리티컬 누락은 아닙니다.
줌 라이브트랙 L-8, ZOOM LIVETRAK L8
줌 라이브트랙 L-8

While USB recording is handy, the standalone recorder side of things really won me over. It’s just so quick and convenient — a joy to use. It’s the default mode at startup, but you can access it at any time by pressing the big Recorder button. In this mode the function buttons serve as transport and tempo controls, and access a Setting menu.
Initial recording tests are intuitive.
You record‑arm the desired tracks using their Rec/Play button (which cycles through three states: record‑arm, multitrack playback, and off, whereby the input source is routed to the mix bus during recording/playback. Hit the Record button followed by the Play button: a new project will be created automatically as recording commences. Change the track state to Playback and hit the Rwd button, and you can audition what you recorded and adjust the channel settings to taste.
USB 레코딩은 편리하지만
독립형 레코더 측면이 정말 마음을 사로잡았습니다.
정말 빠르고 편리해서 사용할 수 있습니다. 시작 시 기본 모드이지만,
큰 레코더 버튼을 누르면 언제든지 액세스할 수 있습니다.
이 모드에서는 기능 버튼이 전송 및 템포 조절 역할을 하며 설정 메뉴에 액세스할 수 있습니다.
초기 녹음 테스트는 직관적입니다.
Rec/Play 버튼을 사용하여 원하는 트랙을 녹음하고,
녹음/재생 중에 입력 소스가 믹스 버스로 라우팅되는
Rec/Play 버튼(녹음 암, 멀티트랙 재생, 꺼짐 등 세 가지 상태를 순환합니다.
Record 버튼을 누른 다음 Play 버튼을 누르세요
녹음이 시작되면 새 프로젝트가 자동으로 생성됩니다.
트랙 상태를 Playback으로 변경하고 Rwd 버튼을 누르면 녹음한 내용을 오디션하고
채널 설정을 취향에 맞게 조정할 수 있습니다.
줌 라이브트랙 L-8, ZOOM LIVETRAK L8
줌 라이브트랙 L-8

You can also navigate the project timeline by turning the Select Wheel (a rotary encoder with integral push button) and press it offline or during playback/record to insert up to 99 markers per project; the Fwd and Rwd buttons take you to the next marker in either direction. It’s a great way to mark unhelpful noises or fluffed lines that need attention. It’s worth noting, though, that pressing the button produces a small acoustic click, so if using this while recording you’ll want to keep your mics at a safe distance.
Hitting Setting (function 4) accesses the menu. It’s easy to follow but anything you don’t understand will be clearly explained in the manual. Here, you can create, delete and rename projects, assign recorded or imported sounds to different tracks, scroll through a list of markers and jump to any one. You can also specify the recording format, and engage auto (threshold‑triggered) record and/or 2‑second pre‑record modes. And you can set different playback modes, so playback stops at the end of a project or at the end of all projects, or loops around one or all.
프로젝트 타임라인을 탐색하기 위해
Select Wheel(통합 푸시 버튼이 있는 로터리 인코더)을 돌리고
오프라인 또는 재생/녹음 중에 눌러 프로젝트당 최대 99개의 마커를 삽입할 수 있습니다.
Fwd 버튼과 Rwd 버튼은 어느 방향으로든 다음 마커로 이동합니다.
도움이 되지 않는 소음이나 주의가 필요한 플러핑 라인을 표시하는 좋은 방법입니다.
하지만
버튼을 누르면 작은 음향 클릭이 발생하므로 녹음 중에 이 기능을 사용하면
마이크를 안전한 거리로 유지할 수 있습니다.
설정하기(기능 4)는 메뉴에 액세스합니다.
쉽게 따라 할 수 있지만 이해하지 못하는 내용은 매뉴얼에서 명확하게 설명할 수 있습니다.
여기에서는 프로젝트를 생성, 삭제 및 이름 변경하고,
녹음된 사운드 또는 가져온 사운드를 다른 트랙에 할당하고, 마커 목록을 스크롤한 다음
아무 트랙에나 점프할 수 있습니다.
녹음 형식을 지정하고, 자동(임계 트리거) 녹음 및/또는 2초 전
녹음 모드를 활성화할 수도 있습니다.
또한 다양한 재생 모드를 설정하여 프로젝트가 끝날 때 또는 모든 프로젝트가 끝날 때
재생을 중지하거나 하나 또는 모두를 반복할 수 있습니다.
줌 라이브트랙 L-8, ZOOM LIVETRAK L8
줌 라이브트랙 L-8

The metronome is a welcome feature for those laying down music projects one track at a time. You’re offered control over the sound (Bell, Click, Stick, Cowbell or Hi‑Q), the pattern and most basic time signatures. The time‑signature options are adequate but not extensive; there’s no 9/8, for example. A Tempo button provides a tap‑tempo facility and allows you to use the Selector Wheel to set the tempo between 40 and 250 bpm with a resolution of 0.1bpm.
There are more menu functions than I’ve described here, all of which are fully detailed in the manual, but you get the idea: if your needs are conventional, Zoom have you covered; if they’re more esoteric I’d suggest that you consult the manual to ensure they’re fully catered for.Another function button (8) puts the recorder into Overdub mode, which determines if recording will be overdubbed in the current project or a fresh project will be created for the recording. Note that this mode doesn’t support 96kHz recording; I don’t know why that is. It does include latency compensation, though, so you can monitor your performance and the backing in perfect sync, and things will line up perfectly on playback.
메트로놈은 음악 프로젝트를 한 번에 하나씩 진행하는 사람들에게 환영받는 기능입니다.
사운드(벨, 클릭, 스틱, 카우벨 또는 하이큐),
패턴 및 가장 기본적인 시간 서명을 제어할 수 있습니다.
시간 서명 옵션은 충분하지만 광범위하지 않으며, 예를 들어 9/8이 없습니다.
템포 버튼은 탭 템포 기능을 제공하며 셀렉터 휠을 사용하여
0.1bpm의 해상도로 40에서 250bpm 사이의 템포를 설정할 수 있습니다.
제가 여기서 설명한 것보다 더 많은 메뉴 기능이 있으며,
이 모든 기능은 매뉴얼에 완전히 자세히 설명되어 있습니다.
하지만
여러분의 요구 사항이 전통적이라면 Zoom을 사용하고,
더 난해하다면 매뉴얼을 참조하여 완전히 충족되는지 확인하는 것이 좋습니다.
또 다른 기능 버튼 (8)은 레코더를 오버더빙 모드로 전환하여
현재 프로젝트에서 레코딩을 오버더빙할지 아니면 레코딩을 위한
새로운 프로젝트를 생성할지 결정합니다.
이 모드는 96kHz 레코딩을 지원하지 않는다는 점에 유의하세요
그 이유를 모르겠습니다.
하지만 지연 시간 보정 기능이 포함되어 있어 성능과 백업을 완벽하게 동기화하여
모니터링할 수 있으며, 재생 시 모든 것이 완벽하게 정렬됩니다.
줌 라이브트랙 L-8, ZOOM LIVETRAK L8
줌 라이브트랙 L-8
Punching in/out is as easy as could be. You navigate to the section where you want the performer to start singing/playing, record‑arm the tracks on which you wish to punch in, and start playback. Hit the main record button to punch in, and hit it again to punch out. You can punch in/out up to 10 times during each playback pass. Between this and the marker system, dropping in corrections becomes second nature very quickly.
Playback or recording is not possible while you’re in the Setting menu, and having to exit the menus before hitting record/play sometimes made me pause for thought. Similarly, once playing back or if you have the record button engaged, ready to record, you cannot change the recording/playback status of individual tracks. When first using the L‑8 I often hit Record and then realised I needed to change the status of one or two tracks. These are both very minor frustrations, though, and I’m sure with more ‘miles on the clock’ any sense of annoyance would evaporate.
입력/출력은 최대한 쉽습니다.
연주자가 노래/연주를 시작할 섹션으로 이동하여
입력하려는 트랙을 녹음-무장한 다음 재생을 시작합니다.
메인 레코드 버튼을 눌러 입력하고 다시 눌러 출력합니다.
재생이 완료될 때마다 최대 10번까지 입력/출력할 수 있습니다.
이와 마커 시스템 사이에서 수정 사항을 삭제하는 것은 매우 빠른 속도로 진행됩니다.
설정 메뉴에 있는 동안에는
재생이나 녹음이 불가능하며, 레코드/플레이를 시작하기 전에 메뉴를 종료해야 할 때
가끔 생각이 나서 잠시 멈추기도 합니다.
마찬가지로, 한 번 재생하거나 레코드 버튼을 활성화하여 녹음할 준비가 되어 있다면
개별 트랙의 녹음/재생 상태를 변경할 수 없습니다.
L-8을 처음 사용할 때는 Record를 누르곤 했는데,
그 후 한두 트랙의 상태를 변경해야 한다는 것을 깨달았습니다.
하지만
이 두 가지 모두 매우 사소한 불만 사항이며,
'마일을 더 사용하면' 짜증이 사라질 것이라고 확신합니다.
줌 라이브트랙 L-8, ZOOM LIVETRAK L8
줌 라이브트랙 L-8

As with USB recording, each of the eight input channels can be recorded pre‑ the Channel Strip and fader, and the post‑fader master mix signal can be captured. Again, the only channel that can’t be recorded is the effects return; I’m not entirely sure why that is but it’s not a particularly important omission. It’s also worth noting that the L‑8 can record via USB to your DAW and direct to the SD card simultaneously, and that a card reader allows your computer to access recordings made to the SD card, or to deposit sounds there for import to recorder tracks, or to the Sound Pads.
USB 녹화와 마찬가지로
8개의 입력 채널 각각은 채널 스트립과 페이더 전에 녹화할 수 있으며,
페이더 후 마스터 믹스 신호를 캡처할 수 있습니다.
다시 말해, 녹화할 수 없는 유일한 채널은 효과 반환뿐입니다.
그 이유는 확실하지 않지만 특별히 중요한 누락은 아닙니다
. 또한 L-8은 USB를 통해 DAW로 녹화하고 SD 카드로 동시에 전송할 수 있으며,
카드 리더를 통해 컴퓨터가 SD 카드로 녹음된 녹음에 액세스하거나
사운드를 녹음 트랙이나 사운드 패드로 전송하여 가져올 수 있다는 점도 주목할 만합니다.
줌 라이브트랙 L-8, ZOOM LIVETRAK L8
줌 라이브트랙 L-8
#줌 라이브트랙 L-8# ZOOM LIVETRAK L8#줌# zoom l8#줌 믹서#
라이브방송# 팟캐스터 레코더#팟캐스터 인터페이스#줌 라이브트랙#
8채널 믹서#8채널 오디오 믹서#멀티트렉 믹서#멀티트렉 레코더#
팟캐스트 레코더#
반응형


